Wainscot Installation
download files for printing

INSTRUCTIONS |

STAIRCASE TIPS |

PART LIST |
Problem: Ordinary drywall, while commonly used in today's homes, lacks the texture and rich look of paneling used in the past.
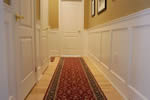
Solution: A wainscoting treatment composed of pre-made kits that can be applied to any wall in a weekend. You can create a more interesting and unique look than simply painting or applying wallpaper to drywall. Provide a more upscale, formal look to any room. |
|
If you have the tools and the know-how to install baseboards, then you have everything you need to install Deco Paneled Wainscoting in any room of your home. Other kits are available for stair cases and for curved walls and will be introduced later on in the month.
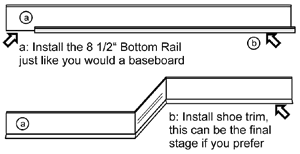
Step 1: Your room probably has baseboard molding installed. If so remove it first. Install the 8 1/2" bottom rail just like you would any baseboard. The 1 5/8" shoe mould (used to cover imperfections in the floor) can be the next or the last step depending on what the flooring plans are.

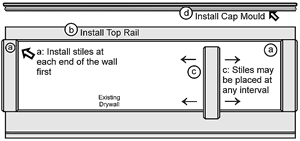
Step 2: Calculate the distance that you would like between the stiles. You will need one stile for every inside and outside corner to start with. Anywhere from 18 to 24" tends to look good. Note the locations of your electrical outlets and phone jacks. Keep in mind that not all the squares necessarily have to be the same size. Mark the stile positions with a pencil.
Have a look this if you have questions about windows and doors. The beauty of this product is that you will end up with symmetrical panels no mater what the wall length is. If you are short any stiles, now is the time to order them.
Tip: when determining your stile locations, you may want to take into consideration the positions of your electrical outlets. Decide whether it is easier to cut around the stiles or move the outlets.
Step 3: Make and install all your inside and outside corners. Use a saw to cut the stiles lengthwise to fit each corner. Use 45-degree cuts for corners and 90-degree cuts where the molding will butt against a window or door trim. More on this...
Tip: use outdoor wood glue (this is better suited for MDF at all the joints and where the stiles meet both the top and bottom rail.
Step 4: Now you are ready to install the top rail. Start by pinning or nailing at one end and work your way down.
Tip: If there is any play between the wall and the stiles, simply add latex caulking in behind to fill in the gaps.
Step 5: Fasten the cap mould (d) on top the the installed top rail (b).

Step 6: Fill in the nail or pin holes with caulking (dap). Where the edge for the stiles or rails meet the wall, in many cases it will be a tight fit and caulking will not be necessary. The paint should fill in any gaps or shadow lines.
Step 7:
Apply your primer coat. Even  though Deco Paneled Wainscot is pre-primed it is best to coat the entire area south of the cap mould. Seeing as how the wall texture is different from the wainscot parts, this additional step will insure that the wood texture blends in with the wall. though Deco Paneled Wainscot is pre-primed it is best to coat the entire area south of the cap mould. Seeing as how the wall texture is different from the wainscot parts, this additional step will insure that the wood texture blends in with the wall.
Tip: Before painting, fill in any damaged areas.
Step 8: Apply your final coat of paint. We recommend a semi-gloss or melamine paint for easy cleaning. Or...a coordinating wallpaper can be used in the interior of the panels.
Thanks again for ordering Deco Paneling Wainscoting
If you have any comments or suggestions, drop me an mailto:customercare@deco.com?subject=suggestions">email anytime. |
 |
|