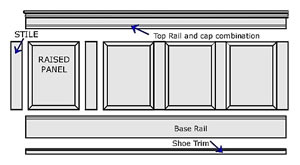
Installing Raised Panel & Cottage Syle Wainscot

Although wainscoting is an old world wall treatment, it still holds up today with its timeless beauty. It will fit into just about any situation, from classic to modern decorative styles. The Deco Raised Panel Wainscot system and the Deco Cottage Style Wainscot system were created for the do-it-yourselfer; they are systems that are easy to install and finish. These instructions will explain how to install both of these systems. The only difference between the two is in the edges of the panels. One is routered with a ½" inch total thickness and the other is flat with a total thickness of ¼" inch. Please disregard any of the routering instructions when installing the cottage style wainscot. Please read all the instructions before installing.
-
First, remove the cover plates from all electrical outlets. All baseboards should also be removed; the wainscot kit comes with its own baseboards. Be careful and try not to damage the wall board, you want as much support in behind the panels as you can get.
-
Measure from the floor-up the height for the wainscoting and make pencil marks. Use a four-foot level to mark the height line around the entire room. Go around the room with a stud finder and mark the location of the studs. Draw a vertical line along the center of each stud to just above the height line to mark for the starting point for installing the baseboards and rails. Although nailing into studs is important, if you nail in an "X" pattern you create a fastener in the wall board. This will allow you to not be limited by the dimensions of the studs and the spacing between them.
-
Lay the room out and try to use as many whole panels as possible. Try to lay it our so that electrical plugs and central vacuum outlets land in the middle of the panel or the middle of a stile.
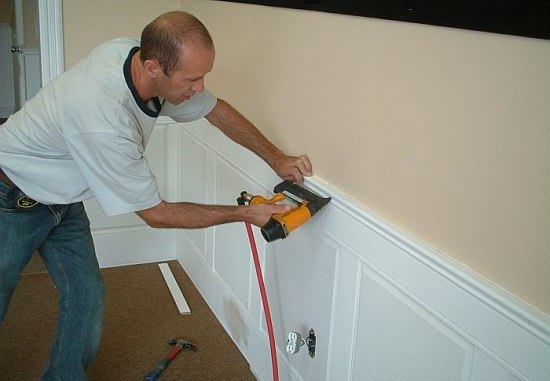
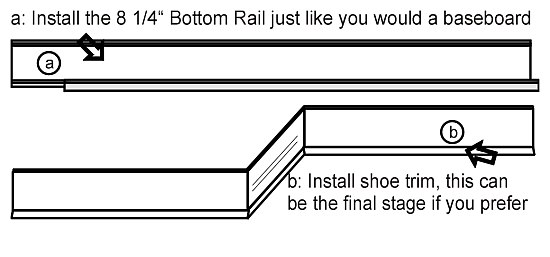
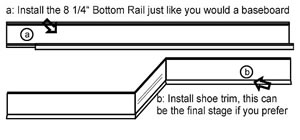
- You are now ready to install the base board. Find the most level part of the room and start there so that you allow some room to work with in case the room slopes at one end. Using a pneumatic nail gun, place your nails into the studs to attach the base board. You can hammer finishing nails through the studs if you don't have a nail gun. Continue until all the base boards are in place. Remember to set the pressure of the compressor so that the nail head gets counter sunk in the wood approximately 1/16th of an inch. This will make finishing easier later on in the installation.
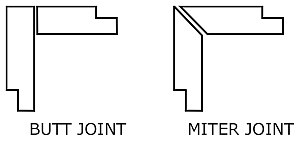
 Begin by installing the center stile with adhesive. Continue down the wall line, installing a stile, then a panel and repeating this process. Constantly check level and plumb to make sure the pieces fit together properly. Remember that when you hit a corner you may have to rip down a stile in order for it to fit and to maintain symmetry. In the case of a 90 degree corner, the corners can be butt jointed. If there is a bigger or smaller angle on the corner, you must use a table saw to rip the appropriate angle in order to create the corner. Begin by installing the center stile with adhesive. Continue down the wall line, installing a stile, then a panel and repeating this process. Constantly check level and plumb to make sure the pieces fit together properly. Remember that when you hit a corner you may have to rip down a stile in order for it to fit and to maintain symmetry. In the case of a 90 degree corner, the corners can be butt jointed. If there is a bigger or smaller angle on the corner, you must use a table saw to rip the appropriate angle in order to create the corner.
Eventually you will run into a corner. The raised panel you will use should be cut down using a table saw on one side. After cutting it down to the appropriate size, it must be routered and shaped using the #519 Freud Router Bit which will give you the shape of the rest of the panel and allow the cut side to fit in to the grooves provided. Deco moldings chose the Freud bit because of its availability. This bit will give you the exact curvature of the panels.
For electrical outlets, be sure that an outlet falls in the middle of a panel or stile, not around a groove. Place a panel under the outlet and mark the width. Extend the lines on the panel with a straight edge, and then place the panel beside the outlet to mark the height. After drilling pilot holes at each corner of the panel outlet marks, use a coping saw to make the cutout. Then attach the panel to the wall, matching up the outlet with the outlet hole.
The wainscoting may alter the wall outlet so that an extender is necessary to keep the outlet flush with the new wainscoting. Simply turn off the power, attach an extender to the panel and re-mount the outlet with extended screws. Check with your local electrical codes to see if this solution will meet code.
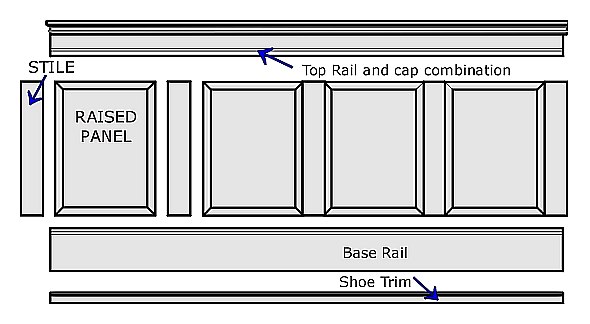
Once all wainscoting panels and styles are in place, it's time to finish the top. You will need a miter saw to cut and miter the top rail pieces for installation. Slide the top rail over the rabbit cuts and secure the rail with a pneumatic nail gun. When you get a corner the top rails cannot be butt jointed due to their design, so they must be mitered to allow the stiles and panels to fit in behind.
Next, place the Cap Rail over the top rail and secure with finishing nails and adhesive. Lay Shoe Molding along the bottom of the wainscoting and secure it with a pneumatic nail gun, as well.
Use the Spackling Compound (plaster mix) to fill in any nail heads and seams. A paint able latex caulking should be used to fill in all other seams (between shoe mold and Base board). Allow the spackling compound to dry before sanding it down smooth. In order to get a clean line of caulking you can use a wet finger or rag and run it along the bead of caulking you just laid down.
You are now ready to paint. We recommend semi gloss paint so that any stains can easily be cleaned off.
Installation Tips
When installing on a wall longer than the available length, you should cut the ends of the rails and the baseboard on a 30 degree angle. You will then cut the opposite angle on the corresponding end of material; this will make for an invisible seam.
When you get to a low window, you can either run the top rails right into the window casing and cut the panel to suit. Or you can cut the top rails so that they surround the window casing and cut the panel to suit. Either way is acceptable, with the first method being easier to do.
If you are considering painting the house, install the wainscoting first. You will get a better finish when this is installed first, and you won't worry too much about getting the walls dirty.
The Deco raised panel wainscot system comes pre-primed. Save yourself some time and paint it only after you have completed the installation and have finished the sanding and caulking.
If you are getting hardwood or any other type of floor treatment, get that done first before you install the wainscoting. This way you can determine where to start the wainscoting rather than doing it and trying to fill the gap later on.
The shoe molding is not necessary if you have carpeting. It is a decorative item which is used to add more heft to the bottom of the base board. Its practical application is to cover gaps left by flooring installers for expansion of the floor.

|